Our blog
Company update
Hello, everyone!
It was a long time since my last post, and I had one reason for this – big business customers came to us with large orders after they found us, and we were not ready for the big show. Big qty orders, tough deadlines and everyday online technical support. It was tough challenge for us. We tried to reserve at least some of panels from each batch to refill our online web-shop and support our community, but these panels were sold in several hours, and we again got tons of emails with requests for stock.
After couple months like this we saw only one solution – to upgrade our whole SMT production line for higher grade equipment, hire additional staff, and to automate production planning and order processing tasks. We managed to find new big office for production, sign rent, and started renovation. At the same time we ordered new SMT equipment: semi-automatic stencil printer with optical alignment, high-speed PnP from Autotronik with dual heads, new oven with nitrogen process, and PCB cleaning machines. They will arrive next Tuesday. Equipment is so big and heavy, that we have to use crane to hoist to 2nd floor, and will dismantle window to move it in. Setup and calibration will take around 1 week, after that we will have high-speed production.
Also, we work to automate our process handling and shipping procedures. Our goal is to reduce time to 1-2 hours from receiving order to shipping it to you. Yes, we are working to improve all the time.
Now, lets check out several news regarding our products:
- Our current 10″ LG panel (1280×800) is obsolete (got EOL status last December). We can continue to supply it only to customers who has signed supply contract with us.
- We have new 10″ IPS panel with resolution 1366×768, black frame, 10 fingers multi-touch with USB interface. Good news is that this panel will have integrated HDMI board like our 7″, with LVDS scaler, HDMI audio extract, and USB HID touch driver. Thus, you will be able to use it hassle-free with virtually any hardware platform. No more kernel hacks, no more resolution limitations!
- We also finished design of FullHD 10″ panel with capacitive touch. It will be available for order end of February.
- Next is small-size cheap LCD solution based on FT800 chip. Welcome, Arduino and Launchpad lovers! You will get complete 4.3″ LCD with touchscreen, audio, and SPI/I2C interface.
- Finally, we are starting to offer capacitive touchscreens with USB interfaces for those who has already own LCD, and just need touch interface.
Follow us on Twitter @ChalkElec to get instant updates.
How to update firmware on our touch panels and LCD
All of our new LCD and touch panel solutions are using Microchip PIC microcontroller that controls all other components like touchscreen, HDMI receiver, LVDS scaler, etc. To update PIC firmware, we should run it in bootloader mode, and upload new firmware through USB with special HIDBootloader program. Here are the required steps:
- Download Bootload application, it is available as:
- Compiled Windows application or
- Sources for compilation on Linux and Mac OS platforms
- Disconnect our panel/LCD from power supply, then:
- for 7″ LCD panel short pins 5 and 7 on J1 (pin 1 has square shape) shown in below photo with tweezers, after that, turn on power to board.

How to start HID bootloader
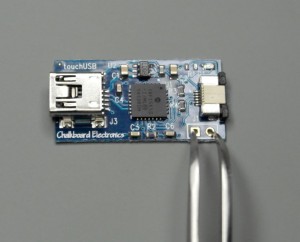
- for 7″ touchscreen short pins 1 and 2 on J1 of touch controller board as shown in below photo with tweezers, after that, plug in USB cable to board.
- for 7″ LCD panel short pins 5 and 7 on J1 (pin 1 has square shape) shown in below photo with tweezers, after that, turn on power to board.
- You should see LEDs on board (D1 and D2 on 7″ LCD, and D1 on 7″ touch controller) blinking alternately. You can remove the tweezers after that
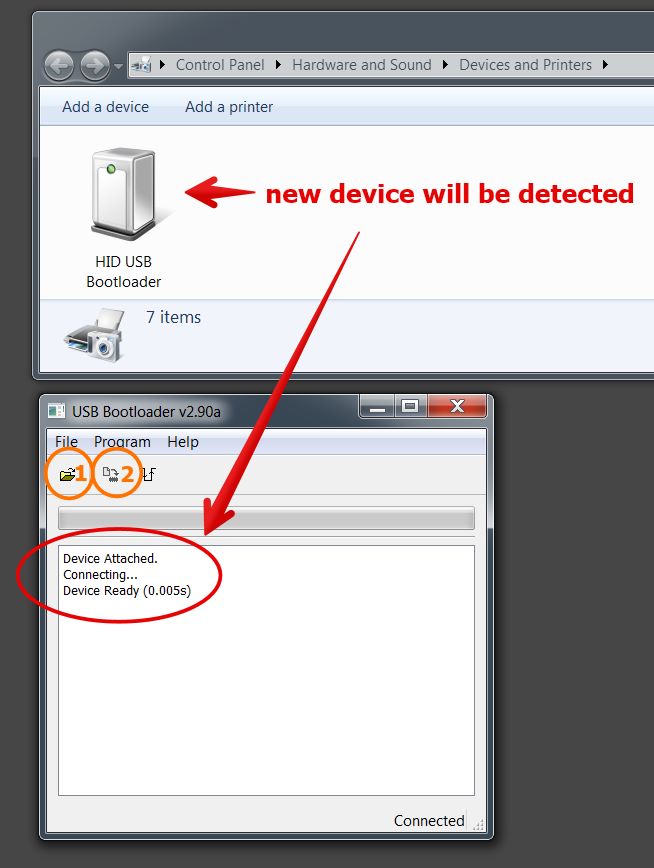
- Also, your PC should detect new device called “HID USB Bootloader” and HID bootloader software will inform that “Device attached”.

Device is detected as a HID Bootloader
- Then you should click button 1 in software dialog, select firmware file (.hex extension), and press button 2 to upload it. Wait until software inform that “You may now unplug or reset the device”


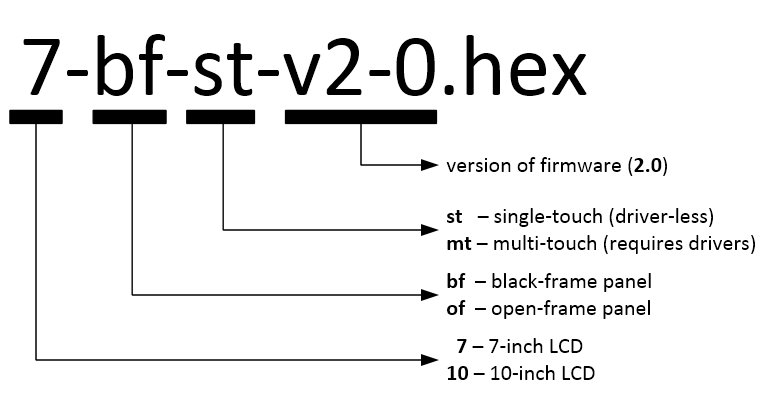
Firmware is enumerated as below. For touch-only panels and LCD-only panels you can use any version of firmware for your size LCD. In case of any technical request, please let us know version of firmware that you use
Firmware updates will be published on corresponding product pages
BeagleboneBlack and LCD
We get many questions about running recently released BeagleboneBlack with our LCD Beaglebone cape and HDMI converter. I made several tests in our lab and can confirm that both versions of our boards (cape and standalone HDMI converter) work well with BeagleboneBlack.
Below are steps required to get Linux logo on our 7″ and 10″ LCDs.
As usually, I used Robert Nelson’ Linux image in my tests.
My SD card is detected as /dev/sdb – if yours is different, then please update in step 4.
1 2 3 4 5 | wget https://rcn-ee.net/deb/rootfs/wheezy/debian-7.1-console-armhf-2013-08-26.tar.xz tar xJf debian-7.1-console-armhf-2013-08-26.tar.xz cd debian-7.1-console-armhf-2013-08-26 sudo ./setup_sdcard.sh --mmc /dev/sdb --uboot bone sync |
After that you should update uEnv.txt file on SD card in partition “boot” to setup correct LCD resolution.
I created uEnv.txt with all 4 possible combinations for our products (HDMI/cape version of board, 10″ LCD with 1280×800 or 7″ LCD with 1024×600 resolution). You should uncomment only one line, and comment others three. File is uploaded here: http://goo.gl/N03vlE
Now your image is done. If everything is OK, you will see Linux logo in 3-4 seconds after start-up.
Update: the trick is to add letter “M” after resolution in uEnv.txt file – this forces kernel to calculate LCD timings based on custom resolution.
Update on 7inch status
UPDATE 22-Jul-2013: we finished new PCB design and made tests that were positive. New PCBs and components are ordered, we will do our best to start shipping for opened pre-orders end of next week.
Short version:
After-production tests showed that we have problems with design and need to go for one more re-design/production cycle. Therefore, we are returning money for all pre-orders, and will open sales only after the products in stock are assembled and tested.
Long version:
Last weeks we had real hell here. We assembled first batch of 12 displays and found that almost all of them have serious problem with video synchronization. Others have problems with video colors. It took a lot of time to go through all checkings and tests to figure out that problem is not with schematic, PCB, LCD, components, EMI, but with LCD side connector. Let me show you our current LCD connection – it looks like this when assembled and bonded to bottom side of LCD:

“Finger” part of PCB is used as a mate connector for LCD, it has contact pins on bottom side:

PCB thickness is 1.6 mm, thickness of this “finger” is 0.3 mm.

We ordered third-party CNC milling of “finger” part to reach required thickness. And that’s the source of problem – real thickness is 0.2-0.25 mm and it varies. As a result, some pins don’t have solid contact with LCD connector and we get problems with synchronization and colors. Its pretty clear that we have to re-design this connection part between PCB and LCD. It will take several weeks additionally.
What we are going to do:
- We will re-design connector part. Currently, we consider two approaches: rigid-flexible PCB or normal PCB with FPC connector and short (1-2 cm) FPC cable.
- We received your pre-orders several months ago, and still can’t supply product. We can’t keep you waiting anymore, therefore we decided to offer you one of following:
- we refund your money and provide $15 discount coupon for any current or future purchase in our web-shop
- alternatively, we can offer our current 10″ bundle as a substitution
- We will collect your decisions to specially created e-mail: report@chalk-elec.com – please provide your full name and order # to help identify you and your order. Next week, Monday (1st July) we will proceed to refund money by default to anyone who didn’t select any option.
- We will continue to work on 7inch integrated product, and I will publish our progress in Twitter @ChalkElec and here in blog.
- We will open stock after we get assembled and tested units.
I personally receive many emails, tweets and blog comments with requests about release date and status, and we are executing all possible approach to release it as soon as possible. We worked very hard, often stay in office till midnight, and going to continue with this routine until we get it done or turned into Zombies.
